Devise is a flexible authentication solution for
Rails. It is a complete MVC solution based on Rails engines. It allows
you to have multiple models signed in at the same time. It hashes and
stores a password in the database to validate the authenticity of a user
while signing in. The authentication can be done both through POST
requests or HTTP Basic Authentication.
STEP 1. gem ‘devise’ install.
STEP 2. run bundle install
STEP 3. run rails generate devise:install
STEP 4. run rails generate devise:views
STEP 5. Here in this application we mainly need 2 models, one is member model and the other one is contact model. So now we are going to create our member model using devise:run rails generate devise member
The migration file will located in db/migrate/ devise_create_members.rb.

STEP 6. After that you should have to run rake db:create (For creating new database)
STEP 7. run rake db:migrate
Once you run the db:migrate command, rails will create a table called members with the following field that the Devise specified in the migration file. Check the tables have created successfully.
STEP 8. run the server by typing “rails server” and copy and paste the 1 and 2 address to your browser search bar.
STEP 9. run rails generate migration add_username_to_members username:string
we have to add the username to the sign-up form. This command will generate another migration file in your “db/migrate” directory.

STEP 10. run rake db:migrate
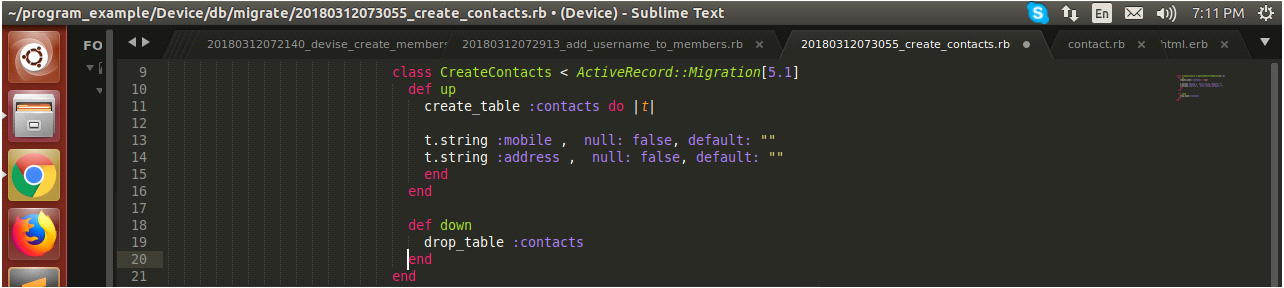
STEP 11. run rails generate model contact
Edit the migration file of contact and specify the 2 fields as shown below. Open db/migrate/ 20180312073055_create_contacts.rb
STEP 12. run rake db:migrate
STEP 13. run rails generate controller home
And then create a new index file for home controller like “app/views/home/index.html.erb” and then add the following

STEP 14. Once you have done, Open app/config/routes.rb
add the line
root :to =>’home#index’
STEP 15. run rails generate controller registration
Open “app/controllers/registration_controller.rb” and then edit the file as shown below

STEP 16. We have to mention the relationships between 2 models (member,contact). Here the relationship will be as follows.
Open_Filepath : app/models/member.rb

Open_Filepath : app/models/contact.rb

STEP 17. Now refer the registration controller file in app/controllers/registration, here after completing the registration & the values that the member entered is stored in the table successfully, I just redirected the member to the dashboard page. So we have to add that page to our home controller.
Open_Filepath : app/views/home/dashboard.html.erb

STEP 18. Open app/config/routes.rb and you have to specify this path in our routes.rb file

STEP 19. run “rails s” and go to http://localhost:3000 address to your browser search bar
Source: http://www.cryptextechnologies.com/blogs/ruby-on-rails-application-using-devise
STEP 6. After that you should have to run rake db:create (For creating new database)
STEP 7. run rake db:migrate
Once you run the db:migrate command, rails will create a table called members with the following field that the Devise specified in the migration file. Check the tables have created successfully.
STEP 8. run the server by typing “rails server” and copy and paste the 1 and 2 address to your browser search bar.
STEP 9. run rails generate migration add_username_to_members username:string
we have to add the username to the sign-up form. This command will generate another migration file in your “db/migrate” directory.
STEP 10. run rake db:migrate
STEP 11. run rails generate model contact
Edit the migration file of contact and specify the 2 fields as shown below. Open db/migrate/ 20180312073055_create_contacts.rb
STEP 12. run rake db:migrate
STEP 13. run rails generate controller home
And then create a new index file for home controller like “app/views/home/index.html.erb” and then add the following
STEP 14. Once you have done, Open app/config/routes.rb
add the line
root :to =>’home#index’
STEP 15. run rails generate controller registration
Open “app/controllers/registration_controller.rb” and then edit the file as shown below
STEP 16. We have to mention the relationships between 2 models (member,contact). Here the relationship will be as follows.
Open_Filepath : app/models/member.rb
Open_Filepath : app/models/contact.rb
STEP 17. Now refer the registration controller file in app/controllers/registration, here after completing the registration & the values that the member entered is stored in the table successfully, I just redirected the member to the dashboard page. So we have to add that page to our home controller.
Open_Filepath : app/views/home/dashboard.html.erb
STEP 18. Open app/config/routes.rb and you have to specify this path in our routes.rb file
STEP 19. run “rails s” and go to http://localhost:3000 address to your browser search bar
Source: http://www.cryptextechnologies.com/blogs/ruby-on-rails-application-using-devise
Comments
Post a Comment