The dynamics of web development have changed over the years. The HTML
single page coding with CSS styling is an obsolete method now. One of
the open source front end web application framework is the JavaScript
based AngularJS, which has been in the industry for around 6 years now.
JavaScript is utilized as a part of all web applications. As the applications develop, JavaScript additionally increments in size and many-sided quality. In such case, it turns into a troublesome situation for Testers to test the web application for different situations.
In some cases, it is hard to catch the web components in AngularJS applications utilizing JUnit or Selenium WebDriver.
Protractor is a NodeJS program which is composed in JavaScript and keeps running with Node to recognize the web components in AngularJS applications, and it additionally utilizes WebDriver to control the program with client activities.
The protractor is a conclusion to end testing system for Angular JS based applications. While most structures center on leading unit tests for Angular JS applications, Protractor centers on testing the genuine usefulness of an application.
NPM (Node.js)
Protractor Installation
Configuration file: This File helps protractor to where the test files are placed (specs.js) and to talk with Selenium server (Selenium Address). Chrome is the default browser for Protractor.
Spec file: This File contains the logic and locators to interact with the application.
Configuration file:
// An example configuration file.
exports.config = {
directConnect: true,
// Capabilities to be passed to the webdriver instance.
capabilities: {
‘browserName’: ‘firefox’
},
// Framework to use. Jasmine is recommended.
framework: ‘jasmine’,
// Spec patterns are relative to the current working directory when
// protractor is called.
specs: [‘Example_spec1.js’],
// Options to be passed to Jasmine.
jasmineNodeOpts: {
defaultTimeoutInterval: 30000
}
};
Spec file:(This is the sample script which is by default present in our directory)
describe(‘angularjs homepage’, function() {
it(‘should greet the named user’, function() {
browser.get(‘http://www.angularjs.org’);
element(by.model(‘yourName’)).sendKeys(‘Julie’);
var greeting = element(by.binding(‘yourName’));
expect(greeting.getText()).toEqual(‘Hello Julie!’);
});
describe(‘todo list’, function() {
vartodoList;
beforeEach(function() {
browser.get(‘http://www.angularjs.org’);
todoList = element.all(by.repeater(‘todo in todoList.todos’));
});
it(‘should list todos’, function() {
expect(todoList.count()).toEqual(2);
expect(todoList.get(1).getText()).toEqual(‘build an AngularJS app’);
});
it(‘should add a todo’, function() {
varaddTodo = element(by.model(‘todoList.todoText’));
varaddButton = element(by.css(‘[value=”add”]’));
addTodo.sendKeys(‘write a protractor test’);
addButton.click();
expect(todoList.count()).toEqual(3);
expect(todoList.get(2).getText()).toEqual(‘write a protractor test’);
});
});
});
Follow the following step.
(Reference link: https://docs.npmjs.com/)
Source: AngularJS Web Application Automation
- What reason do we need Protractor Framework for?
JavaScript is utilized as a part of all web applications. As the applications develop, JavaScript additionally increments in size and many-sided quality. In such case, it turns into a troublesome situation for Testers to test the web application for different situations.
In some cases, it is hard to catch the web components in AngularJS applications utilizing JUnit or Selenium WebDriver.
Protractor is a NodeJS program which is composed in JavaScript and keeps running with Node to recognize the web components in AngularJS applications, and it additionally utilizes WebDriver to control the program with client activities.
- What reason wouldn’t bediscovered in Angular JS web components utilizing Normal Selenium Web driver?
The protractor is a conclusion to end testing system for Angular JS based applications. While most structures center on leading unit tests for Angular JS applications, Protractor centers on testing the genuine usefulness of an application.
- Before we start Protractor, we need to install the following:
NPM (Node.js)
Protractor Installation
- Open command prompt and type “npm install –g protractor” and hit Enter.

- Check the installation and version using “Protractor –version.” If
successful it will show the version as like in below screenshot. If not,
perform the step 1 again.

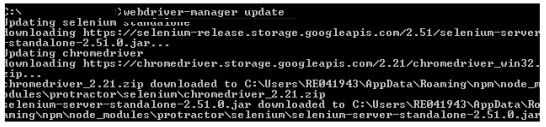
- Update the Web driver.
webdriver-manager update
webdriver-manager start
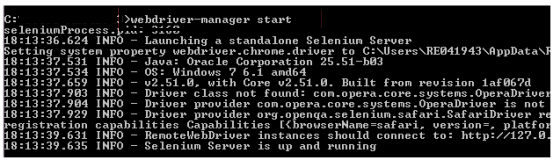
Now, if you go to the following URL (http://localhost:4444/wd/hub/static/resource/hub.html) in your browser, you will actually see the Web driver manager running in the background.
- Sample AngularJS application testing using Protractor
Configuration file: This File helps protractor to where the test files are placed (specs.js) and to talk with Selenium server (Selenium Address). Chrome is the default browser for Protractor.
Spec file: This File contains the logic and locators to interact with the application.
Configuration file:
// An example configuration file.
exports.config = {
directConnect: true,
// Capabilities to be passed to the webdriver instance.
capabilities: {
‘browserName’: ‘firefox’
},
// Framework to use. Jasmine is recommended.
framework: ‘jasmine’,
// Spec patterns are relative to the current working directory when
// protractor is called.
specs: [‘Example_spec1.js’],
// Options to be passed to Jasmine.
jasmineNodeOpts: {
defaultTimeoutInterval: 30000
}
};
Spec file:(This is the sample script which is by default present in our directory)
describe(‘angularjs homepage’, function() {
it(‘should greet the named user’, function() {
browser.get(‘http://www.angularjs.org’);
element(by.model(‘yourName’)).sendKeys(‘Julie’);
var greeting = element(by.binding(‘yourName’));
expect(greeting.getText()).toEqual(‘Hello Julie!’);
});
describe(‘todo list’, function() {
vartodoList;
beforeEach(function() {
browser.get(‘http://www.angularjs.org’);
todoList = element.all(by.repeater(‘todo in todoList.todos’));
});
it(‘should list todos’, function() {
expect(todoList.count()).toEqual(2);
expect(todoList.get(1).getText()).toEqual(‘build an AngularJS app’);
});
it(‘should add a todo’, function() {
varaddTodo = element(by.model(‘todoList.todoText’));
varaddButton = element(by.css(‘[value=”add”]’));
addTodo.sendKeys(‘write a protractor test’);
addButton.click();
expect(todoList.count()).toEqual(3);
expect(todoList.get(2).getText()).toEqual(‘write a protractor test’);
});
});
});
- Execution of the Code
Follow the following step.
- Open the command prompt.
- Make sure selenium web driver manager is up and running. For that give the command as “webdriver-manager start” and hit Enter.
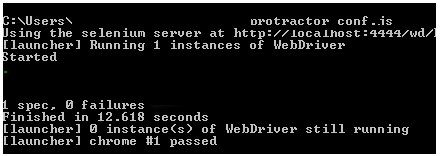
- Open a new command prompt and give the command as “protractor conf.js” to run the configuration file.
(Reference link: https://docs.npmjs.com/)
Source: AngularJS Web Application Automation
Comments
Post a Comment